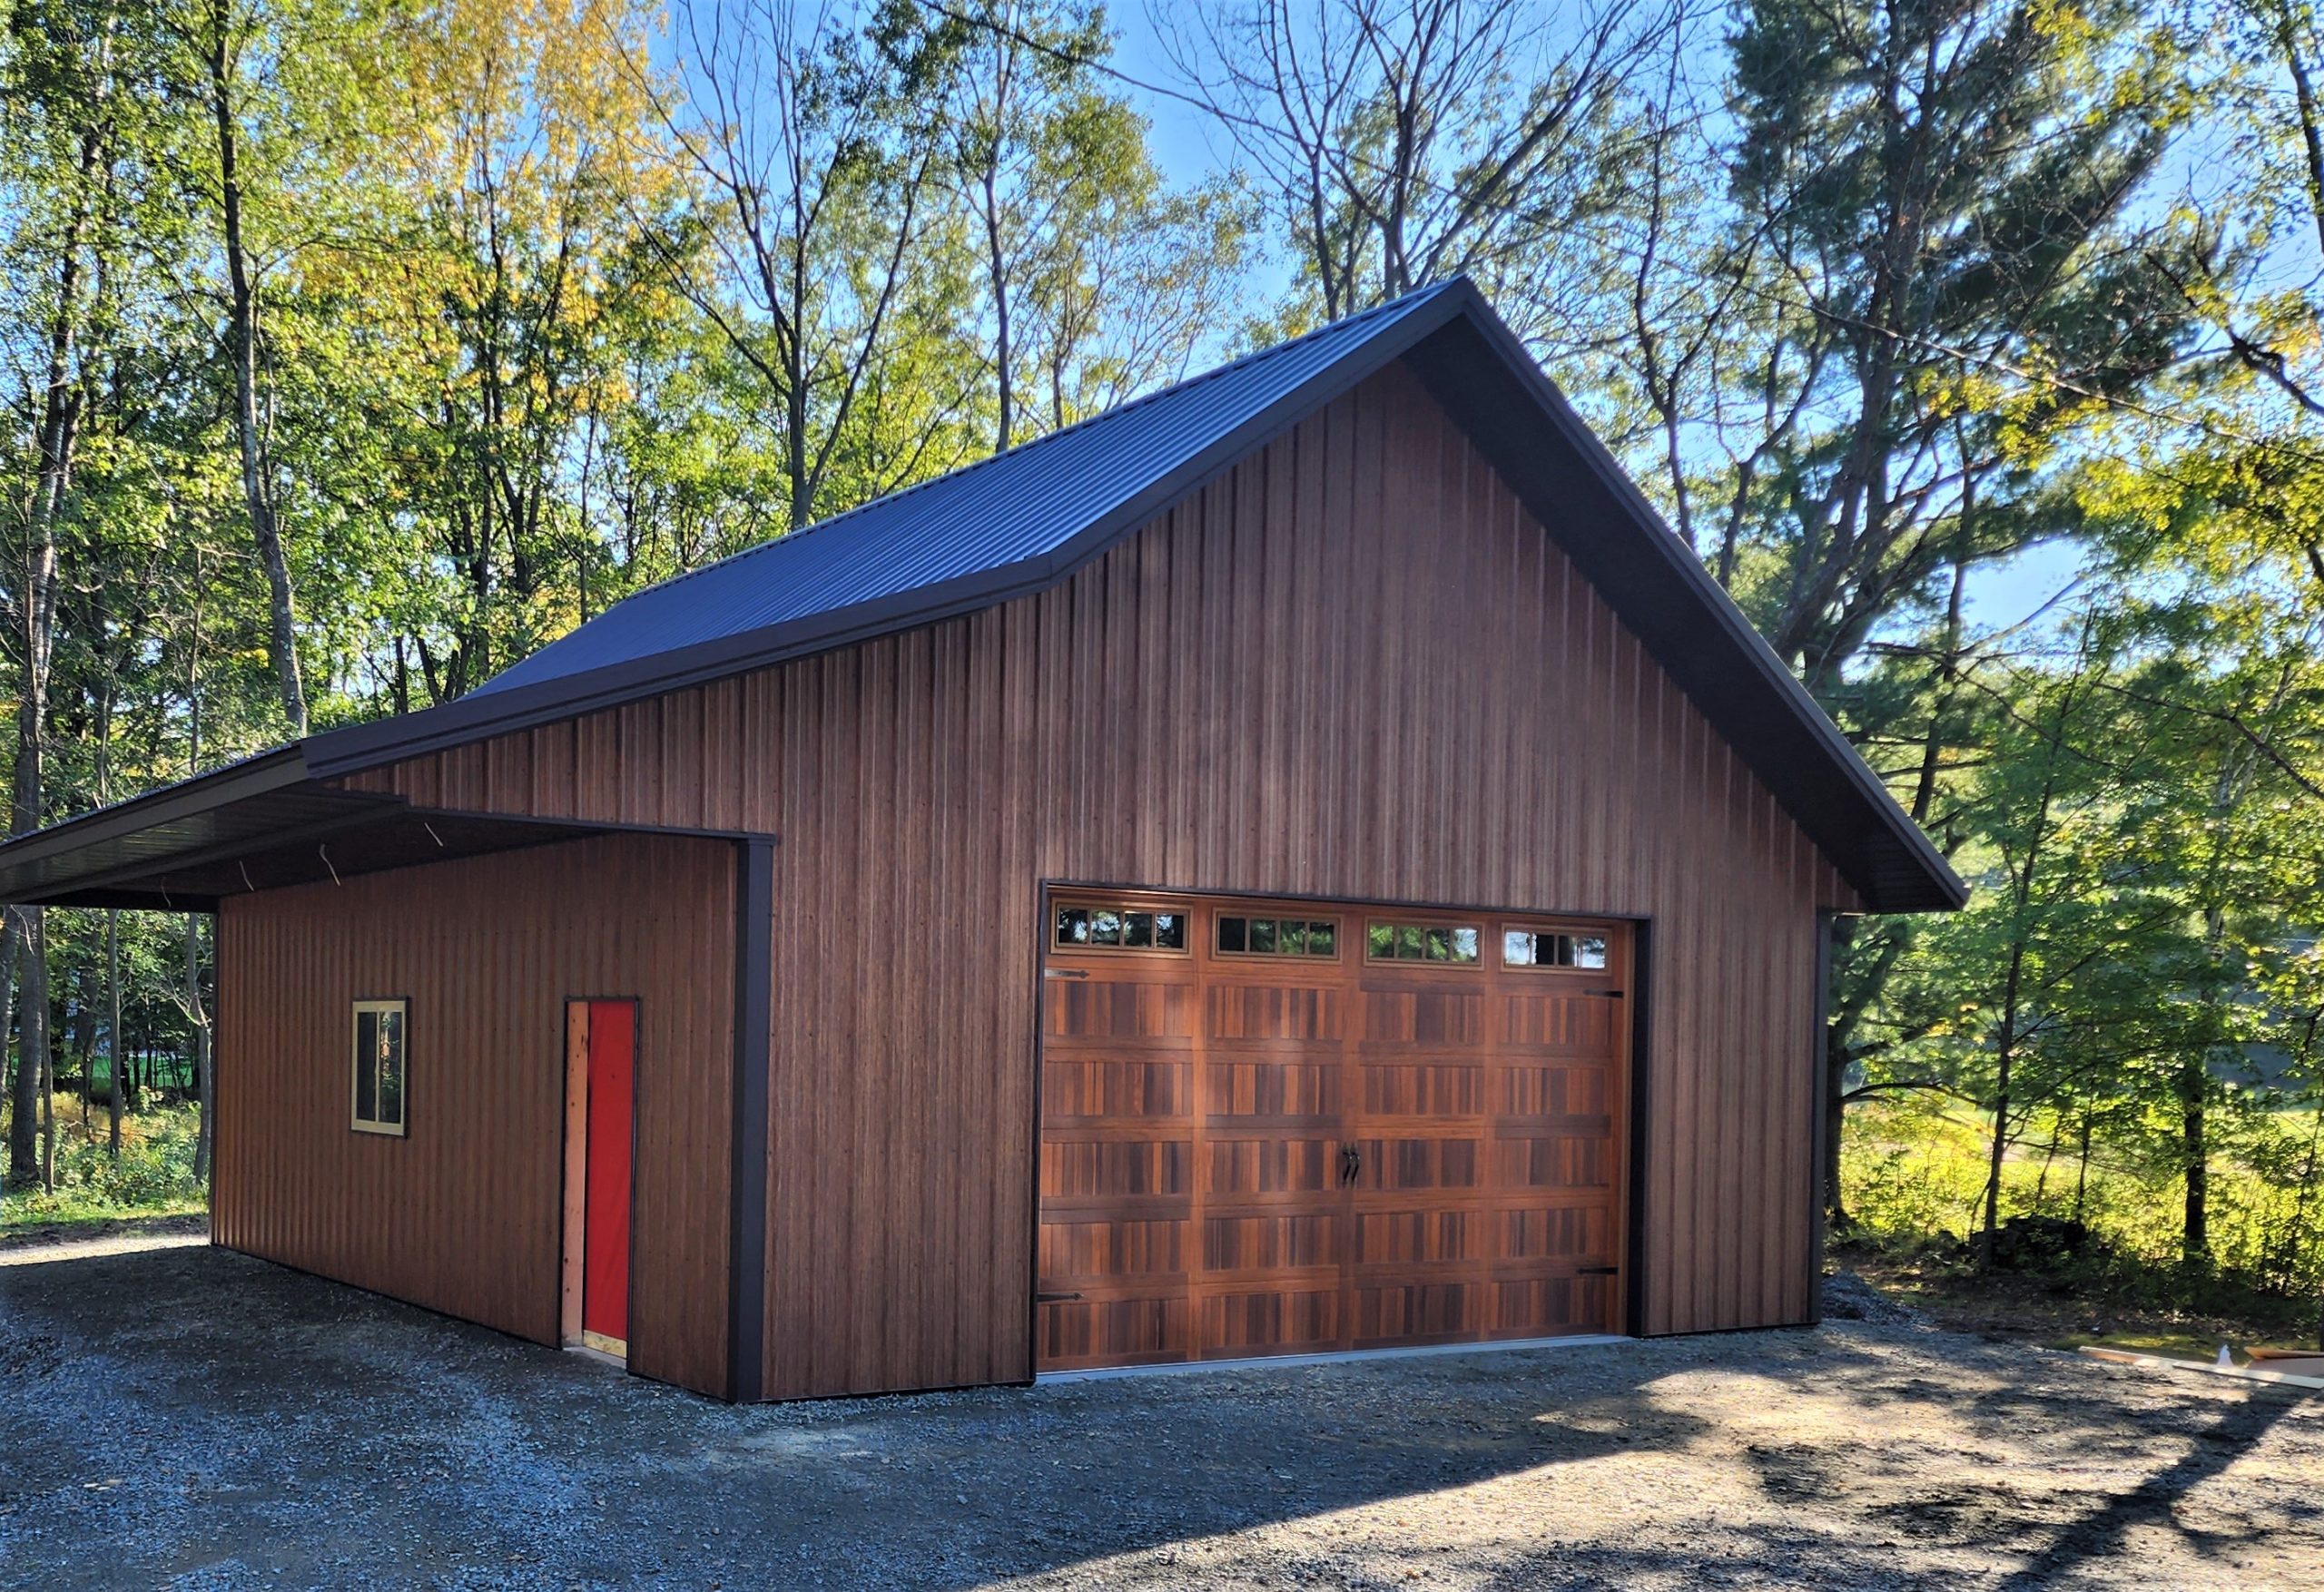
Challenging trusses, an embankment, and height restrictions were overcome for a beautiful post-frame garage
By Mark Gossy of Cedar Valley Post Frame
You may have seen this building pictured in a previous issue of Frame Building News, but I wanted to share a little bit about how it was done because there is a lot happening with this build.
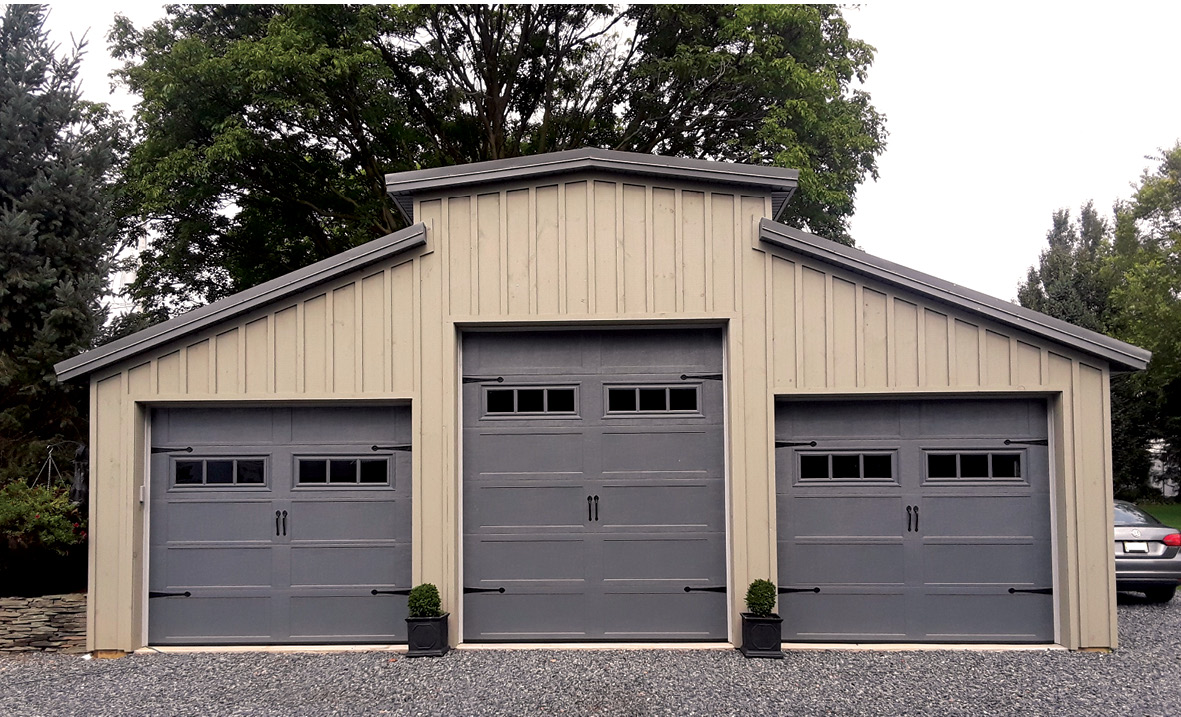
Let me just give you a little background information on how this project arrived at its final design. Kirk Wagner, owner of Kirk Wagner Home Improvements, approached us about designing and building a post-frame garage. His requirements were: keep the structure in style with the existing old-style board-and-batten house, tuck the garage into a 3′ embankment (more on that later), garage door openers, and the desire to get his larger box work truck in to change its oil during winter months.
After a few basic box designs and kicking around the height restriction, Wagner wasn’t really thrilled with the standard “square box garage.” He was also coming to terms with, at the very least, getting the front of his truck in to change the oil would suffice. I thought more on this and decided this is not something I would want if it were my garage. I would want the whole truck inside, especially in the winter, but I needed to fit a 10½’-high overhead door to accommodate the truck.
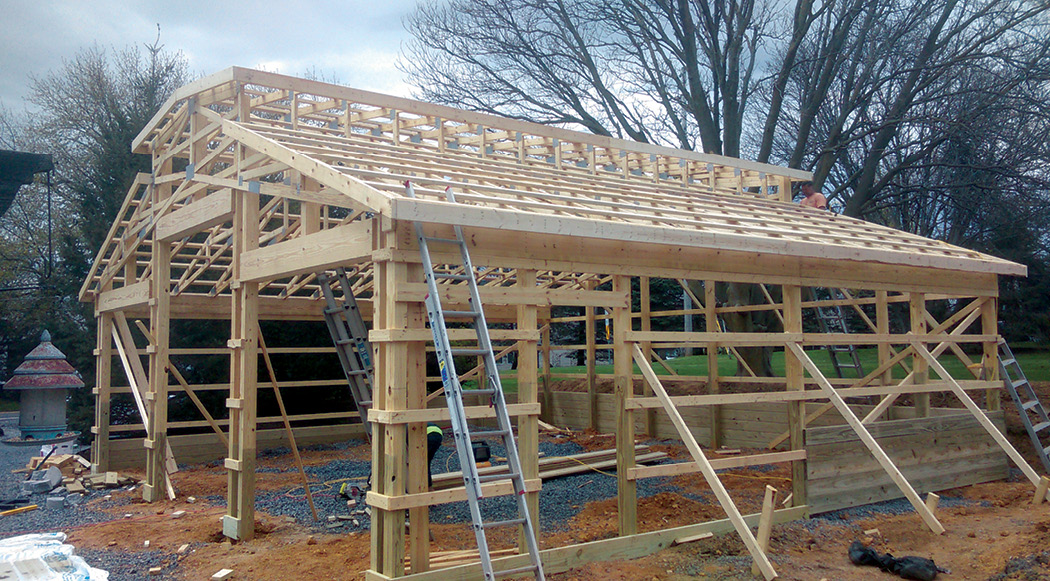
To make matters more difficult, there is a 16′ height restriction for all accessory structures in the township. So how was this achieved? My first thought was to raise the center section using a camber-style truss as shown below.
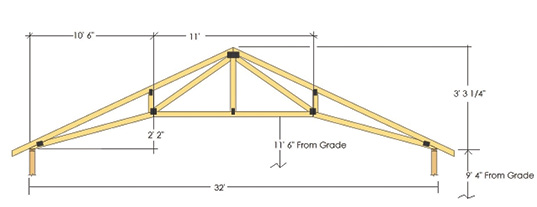
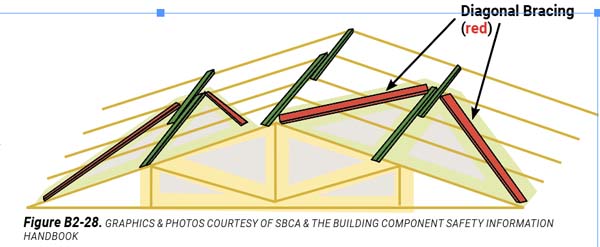
The problem with this design was there was no room for a garage door opener, so it was decided a full scissor truss was the way to go. Unfortunately, a scissor truss top chord pitch of 4.62/12 and bottom chord pitch of 2.65/12 does not meet the loading requirements of 30psf live load.
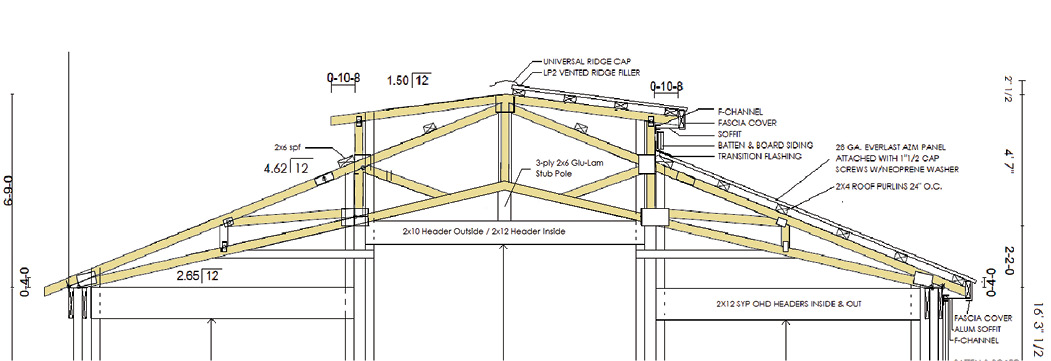
To make matters worse, the addition of the monitor on top with a 1.50/12 increases the load, so a 30-10-5 truss would be required. Eric Hershey and Todd Palmer of Rigidply Rafters were extremely helpful in this regard (I can never say enough about the support I am given by Rigidply Rafters). It was decided that adding additional trusses would solve the issue, and the final truss design turned out like the diagram below.

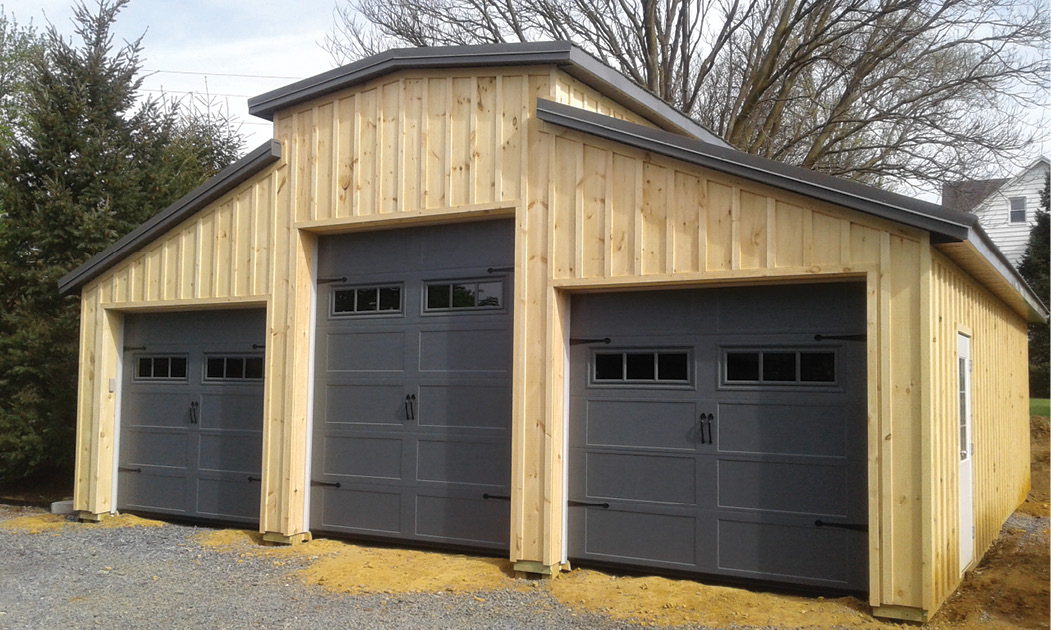
So now we’ve detailed the truss design and layout of this structure, keeping the customer and township requirements in-line. We can now go over some of the additional work and details that brought this project to fruition.
I spent a lot of time considering the design of this building, and one of the additional challenges was that it needed to be built slightly into an embankment. Fortunately for us, there is an existing culvert behind where the structure was to be built, which lent itself perfectly to the overall design by already pitching away from the job site.
The major issue here in the Northeast and across much of the U.S. is the freeze-and-thaw cycle. The ground becomes saturated, freezes, and expands. If you have dirt against your building and water is laying along the side of it, it will freeze and push against the walls. So how do you handle this? One way is to install a couple feet of clean stone against the building with a French drain below grade, wrapping all of the stone and drain piping in a high-quality landscape fabric to keep dirt from infiltrating. In this way, any water lying in the stone that may freeze will push the stone around and up, instead of straight into the walls. The same concept applies to the clean stone installed underneath a concrete floor. I would note here, without a concrete floor to spread the load around to every pole, any loading on the walls would push individual poles, so don’t do it.
In addition to the above, I decided additional posts would be needed as well as some additional depth, just to be sure. For the back wall, we set the posts 4½’ deep and placed them at 5’1″ on center, wrapped the back and part of the sides in ground-contact 2″ x 8″ tongue-and-groove, and covered it with Bituthene® stick-on foundation seal, draping it over the ground at the bottom. We then installed a drain pipe covered with clean stone, wrapped it all, and covered it in the end with topsoil.
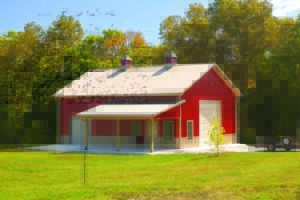
As far as the design details, you may note in the picture on page 23 that the very left side of the garage is the driveway entrance (behind the bird feeder hanging from the trellis). This concerned me since Wagner’s box truck was higher than the eave height; I didn’t want him to worry about clipping the corner of the eave overhang, so we shortened the front overhang by about 5″. In considering what this would do to the overall look of the building, I poured over monitor-style building pictures and came to one conclusion. The standard 12″ overhangs on all of them do sometimes look out of place. This is purely opinion of course, but since I was unable to find an image with smaller gable side overhangs, it was a decision moment. This was one of those moments where you have to decide on function over design. Without hesitation, I instructed the crew to construct the front and rear eaves 5″ shorter. It turned out beautiful.
We couldn’t be happier with the finished product and the customer loves it. Wagner is a very respected home improvement contractor with a high attention to detail that we also require out of all of our workers. He noted during construction that the overhead doorjamb boards looked like they were cut crooked at the bottom and was disappointed, but upon further reflection, it occurred to him we intentionally cut that angle for the concrete to pitch out slightly from the floor.
I believe we were the right company to handle this job for Kirk and his wife Courtney. When you work on a project for someone else in the construction business, especially if they are as precise as Kirk, you’re under a lot of scrutiny every single day, throughout the entire project. My advice is, take the time to do it right the first time using quality products and materials and you will avoid any backlash now or later on. That pays in the long run. They continue to refer our company and that kind of advertising cannot be bought.
I cannot thank Kirk and Courtney enough for letting us do this project for them. Thank you again! –Mark FBN
Click on a photo for a popup slideshow