By Sean Shields, SBCA
Long-span truss installation isn’t for the faint of heart. Post-frame builders know this better than most. As the first article in this series pointed out [Frame Building News, November 2020, pp. 28-30], trusses are designed to only support loads applied within a specific, typically vertical, plane. This is because trusses are narrow in relation to their depth and span and require lateral support as a result. Without this lateral support, the truss, or a portion of its members, will tend to buckle out-of-plane. This lateral bending increases as the truss span lengthens, making it more difficult to keep longer span trusses in plane throughout the installation process.
With this in mind, the second article in this series provided best practices pertaining to truss delivery and jobsite storage. [FBN January 2021, pp. 24-26.] Since lateral bending can cause significant damage to the truss, sometimes in ways that are not readily apparent during installation, it behooves the installer to work with the component manufacturer (CM) to a make sure the trusses are delivered to a location on the jobsite that reduces necessary handling.

The third article focused on the equipment and methodology used in long-span truss lift, acknowledging that things can go sideways quickly and with very little warning. [FBN April 2021, pp. 14-17.] The consequences can also be devastating, from significant truss damage to building collapse and injuries. Fortunately, BCSI B1 provides field-tested best practices to avoid these outcomes and ensure every long-span truss lift goes smoothly.
This article is going to look at another portion of BCSI B1 that provides very important guidance pertaining to setting the initial set of roof trusses and exploring why it is vital this first group of trusses is braced properly to avoid out-of-plane buckling during installation. It will also look at some important aspects of bracing connections and installation tolerances.
Setting the First Truss
In addressing the beginning of the installation process, BCSI-B1 states, “It is important for the Contractor to provide substantial bracing for the first truss erected. Trusses making up the rest of the first set are tied to the first truss and rely upon it for stability. Likewise, after this first set of trusses is adequately diagonally braced, the remaining trusses installed rely on this first set for stability. Performance of the truss bracing system depends to a great extent on how well the first set of trusses is restrained and braced.”


Essentially, the stability of the first truss you set plays a big role in the overall stability of the truss system throughout the installation process. Exterior ground bracing is a vital part of that stability. BCSI Figure B1-16 and B1-17 illustrate best practices for installing ground bracing. This bracing should provide continual support from the point of attachment to the truss down to the ground where it is attached to stakes driven into the ground and securely anchored. It’s important to note the diagonal ground braces should be tied together with a lateral restraint (illustrated in green), along with ground brace struts to ensure the diagonal braces don’t buckle.
To adequately resist lateral loading during the installation process, whether from wind loads or live loads created by installers, top chord temporary lateral restraints (illustrated in green) should be installed directly in line with the diagonal ground braces to ensure the load is transferred through the bracings and not the first truss.
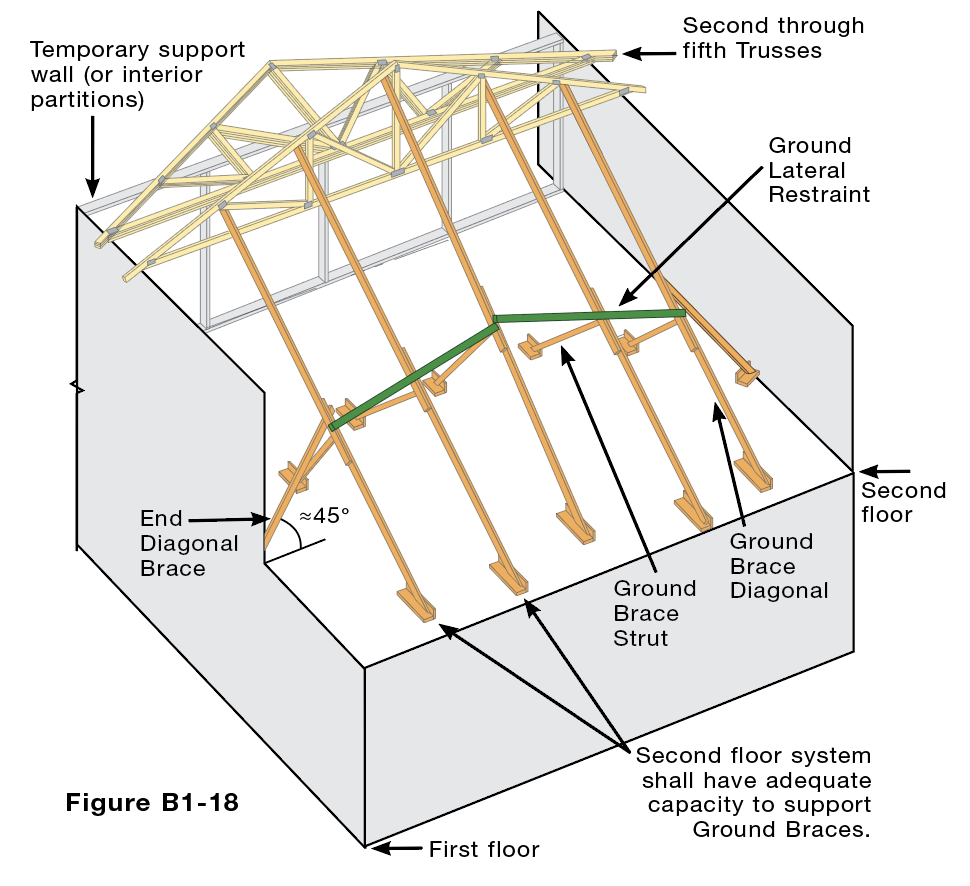
When the building height or exterior ground conditions make it prohibitive to install exterior ground bracing, BCSI B1 provides guidance on installing interior ground bracing. If this is done, it is recommended the first truss installed should be located near the mid-point of the building (see Figure B1-18). Once it is properly braced to the ground, the first set of trusses can be installed and then restrained and braced accordingly before removing the ground bracing to set the rest of the trusses.
Installing Temporary Restraint and Bracing
Again, an individual long-span truss is very narrow in relation to its depth and span. As such, there are three planes within a truss system that need to be braced in order to prevent out-of-plane buckling: the top chord (roof) plane, the web member (interior) plane, and the bottom chord (ceiling) plane. During installation, BCSI states, “It is critical to install lateral restraint and diagonal bracing for the top chord and web member planes immediately to prevent out-of-plane buckling of the truss.”
Top Chord Plane
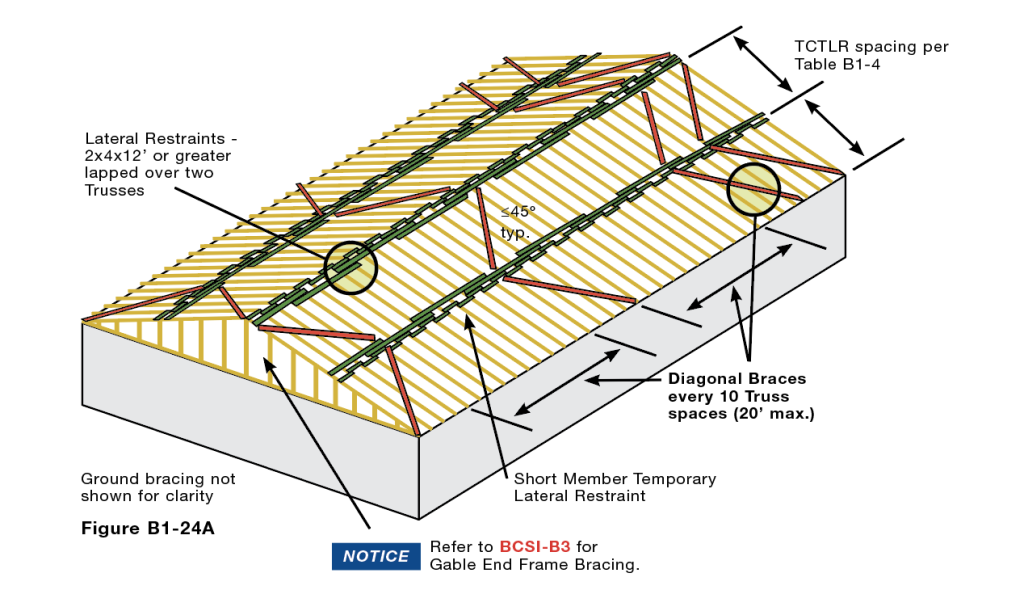
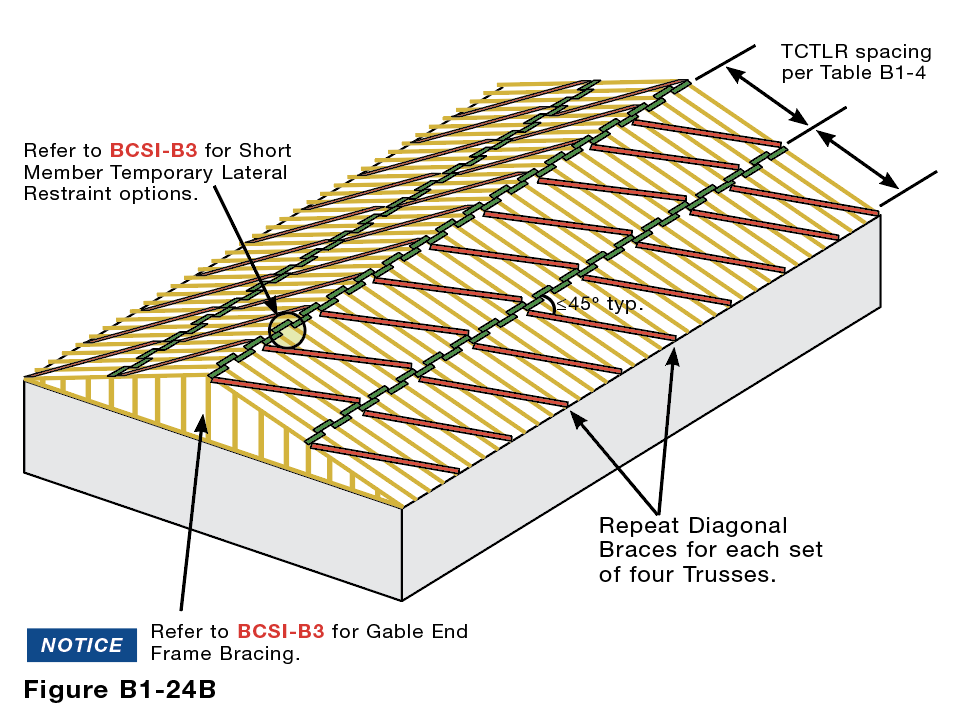
Proper installation of top chord lateral restraint and diagonal bracing is the most important step because the top chords are particularly susceptible to lateral buckling. When affixing restraint and bracing to this plane, it is important to maintain exact spacing between trusses in order to adhere to installation tolerances, which will be addressed in the next section. An example of top chord lateral restraint and diagonal bracing is illustrated in Figure B1-24A. The purpose of the temporary lateral restraint is to tie each truss back to the ground bracing. The purpose of the temporary diagonal bracing is to provide resistance along a non-linear path to prevent the whole truss system from racking in one direction. For installers, this is an important concept to embrace.
Web Member Plane
Unlike the temporary bracing affixed to the top chord plane that must be removed as sheathing is applied (which provides its own restraint), there is some restraint and bracing within the web member plane that is designed to be permanent and there is additional diagonal bracing that should be temporarily applied during installation. The longer the truss span and the greater the truss height, the more this temporary bracing may be necessary to prevent trusses from leaning or dominoing during installation. This is covered in greater depth in BCSI B3, which we will explore in a future article.
Bottom Chord Plane
Temporary lateral restraint and bracing for the bottom chord plane also helps maintain on-center spacing, as well as laterally “stiffening” a group of trusses within the system. Temporary diagonal bracing should also be installed for the same reason as for the top chord, to provide resistance along a non-linear path. This restraint and bracing can be left as part of a permanent stability bracing system once installation is complete, or can be removed once the ceiling diaphragm is installed.
Installation Tolerances
In order for roof or floor truss systems to perform as design, as well as acceptable roof and floor lines for application of sheathing materials, each truss needs to be installed within established tolerances. With regard to plumb, BCSI recommends a truss should be no more than a quarter inch out of plumb for every foot of depth, not to exceed 2 inches. With regard to truss bowing out off plane, BCSI provides a standardized table of the maximum bow allowable based on truss lengths. For trusses over 30 feet, the maximum allowable bow is 2 inches.


The Bottom Line
Trusses are incredibly efficient framing elements that are essential in most of today’s post-frame buildings. During initial installation, it is vital installers adequately brace the first truss in the system to resist lateral loads that would cause an individual truss, or the whole truss system to buckle out-of-plane. BCSI contains best practice concepts to consider when it comes to ground bracing, as well as lateral restraint and diagonal bracing, to ensure the roof system remains stable until roof sheathing and the ceiling diaphragm are fully installed. FBN
BCSI-B1 Summary Sheet – Guide for Handling, Installing, Restraining & Bracing of Trusses
The BCSI-B1 is a guide for builders features proper techniques for unloading, storing, lifting, erecting, installing, restraining and bracing trusses. It includes specific information for protecting trusses from weather and damage at the jobsite, how to lift bundles and individual trusses by crane, restraining/bracing guidelines to prevent trusses from toppling during erection, installation tolerances to keep the trusses in plane and plumb and basic construction loading and materials placement recommendations.
Sean Shields is Director of Communications for the Structural Building Components Association (SBCA, https://www.sbcacomponents.com) and has authored over a hundred articles focused on structural framing and off-site construction since 2004.