Industry experts share their top tips and tricks
Industry experts share their top tips and tricks for the selection and placement of metal roofing clips and clamps.


AceClamp
www.aceclamp.com
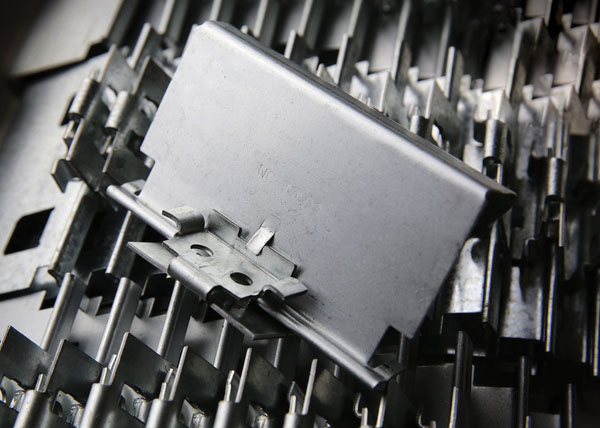
PMC Industries, LLC manufactures a series of sliding-pin roof clamps, AceClamps, specifically designed to attach snow retention/solar racks to a variety of roofing panels. It’s essential to make sure you have the appropriate clamp for the job to ensure a safe installation. Clamps are attached to the vertical rib by various clamping actions, either set screws or sliding pins controlled by a hex bolt and washer.
Determining How Many Clamps Are Needed
Design Load: Each clamp has a design load associated with a specific type of roof panel. The design load should be based on accredited third-party test lab data.
Safety Factor: Know the safety factor which has been used to convert test load to design load.
Environmental Factors: The clamp manufacturer can help you determine how many clamps will be required based on the environmental factors at the project’s location, such as building height, roof slope, roof panel width (rib to rib measurement), code wind speeds, and code snow loads. We employ engineers who will consult on projects to ensure the job specifications are accurate.

Orientation: If installing PV panels, you should know whether they will be installed landscape or portrait. You’ll want to select the clamp that best matches the vertical rib’s configuration to which it will be attached.
Tips and Tricks
• Don’t over-tighten (a common mistake with impact drivers)
• Don’t damage roof panel finishes – Set screws can penetrate the roof panel coating, therefore propagate rust.
• Don’t penetrate thinner metals – Know your gauge or panel thickness, especially for copper, aluminum, or zinc panels.
• Don’t damage the anti-back out features of some clamps designed to withstand vibration from low-level seismic occurrences or wind flutter.
If the project requires multiple rows of snow rails to meet the snow load conditions, install the uppermost row first and work your way down the roof. Should the project be delayed for whatever reason, there could be damage from a sudden snowstorm if only a lower row has been installed and becomes overloaded.
• Do: Select the correct clamp for the seam. Ask a professional and even request a sample before starting the install. One set of AceClamps works on most seams, whether it’s for snow retention or solar mounting.
• Do: Install per the manufacturer’s instructions
• Do: Assure proper install torque for the roof type, panel material, and thickness.
• Do: Use the correct tool – drill driver preferred by most manufacturers.
• Do: Check the installed torque with the recommended torque wrench.
• Do: Re-check the torque after extreme weather events (heavy snow, wind, seismic).
• Do: Match the clamp material to the roof panel material to avoid galvanic corrosion.
• Purchasing clamps from a manufacturer that assembles them in-house, like AceClamp, saves time on the job site.
Always contact the clamp manufacturer if you have any questions about the product, limitations, installation tips, or environmental concerns.

Dynamic Fastener
www.dynamicfastener.com
Clamps, the component commonly used to fasten snow retention and solar systems, are an effective mechanism to fasten such products to standing seam roofs. Our DYNA-CLAMPS® do not pierce the roof. Therefore, they do not violate the warranty from the roof manufacturer.
Knowing what to look for in a clamp is a basic place to start. Ideally, clamps should be versatile, made in the USA and aesthetically pleasing. The clamps must be sturdy and made with high-quality materials.
The quality of the clamp needs to be considered because your metal roof will be around for more than 50-plus years. Some factors to consider are the amount and quality of the independent testing that has been performed on the clamps and the warranty provided by the manufacturer. For example, DYNA-CLAMPS® are non-ferrous, non-piercing clamps for attachments to standing seam metal roofs.
If a series of many DYNA-CLAMPS® are going to be secured to the roof, and if these clamps must stay linear across the roof, as when installing DYNA-GUARD®, then first the installer must secure a taught string in the area that the DYNA-GUARD® will be set — place the DYNA-CLAMPS® along the string to achieve the linear necessity.
Once the DYNA-CLAMP® is in its proper position, use a screw gun and the included allen bit to tighten the set-screws. For the majority of the DYNA-CLAMPS® with two set screws, alternate tightening each set screw.
“By alternating the tightening between the two set screws, that method will best work out the extra space in the standing seam,” “Keep alternating and tightening until both set screws have torque settings at the recommended requirement by Dynamic Fastener for the steel thickness of the panel that the user is currently attaching DYNA-CLAMPS®.”
Furthermore, when fastening a DYNA-CLAMP® to a double-fold SSR profile like Butler MR-24, always place the set screws on the flat side of the double-fold. Notice the protruding lip at the bottom of the opening of the DC-U or DC-DF. Position this protruding lip directly under the double-fold of the panel, so that the lip is in direct contact with the lowest part of the actual fold. Then, drive the setscrews such that they are driven against the thickest part of the double-fold in the panel seam.

S-5!
www.s-5.com
S-5!’s zero-penetration clamps attach ancillary items to standing seam metal roofs, and our brackets utilize state-of-the-art weatherproofing for exposed-fastened roofs, maintaining roof integrity. Warranted for the life of the roof, our products are tested on 500+ different roof profiles and gauges. Applications include snow retention, fall protection, wind performance enhancement, satellite dishes, solar arrays, signs/banners, light fixtures, walkways, HVAC, lightning protection, equipment screens, conduit, condensate lines and more.
Each of S-5’s clamps and brackets has been extensively tested for holding strength by a certified lab. Determining the number of clamps/brackets required for your project is math and science-based—not guesswork. It is contingent on the specific application of the product on a given project. The load (or force) that any connection experiences in service must be matched to the allowable strength of the clamp/bracket for your metal roof’s specific gauge, profile and manufacturer.
Our web-based Clamp-to-Seam Tool assists with matching S-5! clamps/brackets to specific roof profiles and gauges. Our web-based calculators search our entire test database to determine accurate, engineered options and quantities for any application.
S-5! CEO & Founder, Rob Haddock shares this advice:
There are no codes or standards for design, manufacture, use or testing of attachments, so it is a “buyer-beware” scenario. The number of products on the market either untested, inappropriately tested or engineered is alarming. Without proper testing/engineering you are “rolling the dice.”
Use products that are:
• Proven through certified testing to withstand intended design loads
• Engineered and designed in accordance with project specifics
• Produced in an audited facility with quality standards to assure product consistency
• Proven to perform for the entire anticipated roof service life
• Limiting your liability with proof of all the above from the vendor. FBN